

Guidelines for Online CR Filling on MahaPAR System
As of January 2026: MahaPAR (Maharashtra Performance Appraisal Report) system is the mandatory online platform for Annual Performance Appraisal Reports (APAR/CR) for Group A and B (Gazetted) officers across all departments in Maharashtra Government. It ensures transparency, timely submission, and digital record-keeping. The system has expanded significantly since 2017 and now covers over 95 cadres with more than 63,000 officers. All APARs must be filled, reviewed, and accepted online only through MahaPAR portal.
Important GRs
- 1) Format of Performance Report for Group-A Government officers – GR No. 201702021621316207 dated 02-02-2017 → Link
- 2) To Appoint Nodal officer and prepare EMD (Employee Master Data) of Group A and Group B (Gazetted) officers for writing their APAR in MahaPAR application from 2017-18 – GR No. 201712151621110907 dated 15-12-2017 → Link
गोपनीय अहवालाविषयी संक्षिप्त कल्पना
• वार्षिक गोपनीय अहवाल हे कोणत्याही अधिकाऱ्याच्या वर्षभरातील कामगिरीचे प्रतिबिंब असते आणि तसेच सरकारी धोरणांचे नियोजन अंमलबजावणी आणि अंमलबजावणीचे स्पष्ट चित्र प्रदान करते.
• वार्षिक गोपनीय अहवाल ही केवळ निर्णय प्रक्रिया नसून अधिका-यांसाठी त्यांच्या करिअर नियोजन आणि प्रशिक्षणाच्या एकूण वाढीसाठी एक विकास साधन आहे.
• अधिकारी कोणत्याही विशिष्ट वर्षासाठी वार्षिक गोपनीय अहवाल भरताना त्यांच्या प्रशिक्षण आणि कौशल्य विकासाच्या गरजा शोधू शकतात.
महापार आतापर्यंत ......
• महापारचा प्रवास दिनांक ०२/०२/२०१७ च्या शासन निर्णयानुसार ऑनलाईन पद्धतीने सुरु आहे.
• महापारमध्ये कामगिरी मूल्यांकन अहवाल रेकॉर्ड करण्यासाठी, सन २०१६-१७ साठी १२ निवडक गट-अ संवर्गातील ४६३२ अधिकारी जोडले गेले होते.
• त्यानंतर सन २०१८-१९ च्या सत्रासाठी २०९९० अधिका-यांसह गट-ब संवर्ग देखील जोडण्यात आला.
• सध्या महापारप्रणाली मध्ये एकूण ३० सेवेतील ३७९९० अधिकाऱ्यांचा समावेश आहे.
महापारचा विस्तार…
• महापारमध्ये कामगिरी मूल्यांकन अहवाल ऑनलाईन पद्धतीने नोंद करण्यासाठी ९५ सेवामध्ये विस्तार करण्याचा निर्णय घेण्यात आला असून त्यामध्ये ६३००० हून अधिक राजपत्रित सरकारी अधिकाऱ्यांना प्रणालीमध्ये समाविष्ट केले जाईल (आतापर्यंत 30 सेवा जोडण्यात आल्या आहेत).
• त्यानंतर भविष्यात आणखी अधिका-यांचा समावेश केला जाईल.
• EMD (Employee Master Data)
• EMD ही 20 स्तंभांची माहिती असून जी महापारच्या डेटाबेसमध्ये जोडली जाईल. आवश्यक माहिती (दि. १५/१२/२०१७ डिसेंबर रोजी परिपत्रक पहा) खालीलप्रमाणे.
| Sr. No. | Employee Code / Sevarth ID | Appellation (Shri/Smt./Miss) | Official Name | Gender | Father's / Husband's Name | Date of Birth (dd-mm-yyyy) | Nationality | Religion | Aadhar No. | NIC Email ID | Mobile No.* | Department Name | Organization Unit (OU) | Cadre | Designation | Type of Appointment | Appointment Date in Present Cadre (DD-MM-YYYY) | Allotment Year (First Appointment) |
|---|---|---|---|---|---|---|---|---|---|---|---|---|---|---|---|---|---|---|
महापार शब्दावली....
- EMD – कर्मचारी मास्टर डेटा ही 20 स्तंभांमधील अधिकाऱ्याची माहिती आहे.
- Alternate Custodian – प्रक्रिया प्राधिकरण, जो PAR तयार करेल आणि त्यावर प्रक्रिया करेल.
- Primary Custodian – पर्यायी संरक्षकासाठी पर्यवेक्षी प्राधिकरण (supervisory authority for alternate custodian).
- PAR Manager – ती/तो पर्यायी कस्टोडियन अंतर्गत काम करेल, Workflow आणि PAR निर्माण करण्यास मदत करेल (She/he will work under alternate custodian and help to generate workflow and PAR).
- Workflow – हे सबमिशनचे चॅनेल आहे म्हणजेच PAR प्रवाहाचा मार्ग (This is channel of submission i.e. path of PAR flow).
- PAR generation – येथे PAR च्या भाग-1 मधील माहिती भरणे आणि स्व-मूल्यांकनासाठी अधिकाऱ्याकडे पाठवणे आहे (This is to fill the information in section-1 of PAR and forward it to the officer for self-appraisal).
Officer's ROLE for self-assessment
To fill officer’s own PAR following stages needs to be followed-
- Login to MAHAPAR using https://mahapar.maharashtra.gov.in

- Use your full email ID as user ID
Example: smita.joshi75@nic.in - Password: Same as your NIC/GOV mail ID password.

Steps to create Government Email ID
- Go to https://eforms.nic.in
- Click on “LOGIN”.
- Login with NIC/GOV or Alternate email ID (any gov ID, Gmail, Rediff, yahoo, etc.) and follow the instructions to login into the portal.
- You may receive either of the following page.
| Either | Or |
|---|---|
|
You may receive a dashboard showing Total / Pending / Completed requests with other information. |
5) Email Creation Process
Click the Hamburger icon (☰) and navigate to Email (@gov) to start the process.
- Click SINGLE SUBSCRIPTION for a single Email ID.
- Click BULK SUBSCRIPTION for multiple Email IDs.
- Click Mail user (with mailbox) to get a mailbox.
- Click Application user (without mailbox) to skip mailbox.
- Select Date of Birth and Employee Description.
- Choose Name Based for a name-based Email ID.
- Enter preferred Email ID: first.last@gov.in
- Enter Captcha and click Preview and Submit to send request for approval.
6) After submission, the request appears in the reporting authority’s DASHBOARD under pending requests.
8) The reporting officer should click APPROVE in the ACTIONS tab of the pending request.
NOTE: For more details, refer to the “USER MANUAL” available on the login page of https://eforms.nic.in.
NOTE: For further details, please refer to the “USER MANUAL” available on the login page of https://eforms.nic.in.
- Click on the NEXT button to proceed.
- Click on OTP on mobile, then click NEXT to receive OTP on your registered mobile number linked to your email ID.

- Please tick “Don’t ask me on this Device” to save your information in the browser.

Alternatively, you can use a “BACKUP CODE” instead of OTP while logging into MahaPAR.
- You are requested to login to https://parichay.nic.in through OTP for the first-time login, then click on your username at the right corner and go to settings as shown below.

- After clicking on settings, you will find Backup Code with an edit icon as shown below. Click on the edit icon to generate codes. You can use these codes during future logins. If the codes are stolen or missing, you can regenerate and download new ones.

- Post login through OTP/backup code, you can see your service icon as shown below.
Example: In the case below, smita.joshi75@nic.in belongs to Mantralaya service, so the user will have the MAHA-MAN service icon.

- Officers can view their PAR in Inbox → My PAR(x) as shown below.

- Move the cursor to the APAR ID and click to view the PAR.

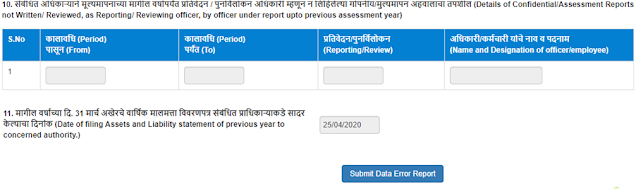
- Before filling up your self-appraisal, please check the basic information page. If you find any error, click on “Submit Data Error Report” as shown below to report the error to the custodian for correction.

- After filling up the PAR, the officer may either click on “DRAFT” to save data for an incomplete PAR or click on “Send to Reporting Authority” to forward the PAR.
- On clicking Send to Reporting Officer in Section-II, the following window will appear for digital signature with DSC or eSign.
- DSC (Digital Signature Certificate) – To use this, register DSC with MahaPAR. Click on the DSC tab in the left pane and register it.
- eSign – OTP will be generated and sent to the mobile number registered with AADHAR. On entering OTP, the document will get digitally signed.
- In case you want to login as reporting/reviewing authority, the login procedure is the same, but post-login you have to select your subordinate's service icon.
If your subordinate belongs to your service, click on the same icon; otherwise, click on the icon as per your subordinate's service. - Reporting Authority can see the subordinate’s PAR pending for reporting in Inbox → Assess PAR.
- After logging in, click on Inbox → Assess PAR → Search officer → Click on APAR ID.
- Fill Section III, click on Draft to save the details filled in PAR.
Click on “Send to Reporting Authority/Reviewing Authority” to forward to the next stage. - On clicking Send to Reporting Officer in Section-II, the following window will appear for digital signature with DSC or eSign.
- DSC (Digital Signature Certificate) – To use this, register DSC with MahaPAR. Click on the DSC tab in the left pane and register it.
- eSign – OTP will be generated and sent to the mobile number registered with AADHAR. On entering OTP, the document will get digitally signed.
- To set Workflow
- To Generate PAR
- To Track PAR
- To update Section I
- To Force Forward
- To Delete the PAR (Exclusively done by Primary custodian)
- To process auto-delegated PAR
- To Disclose the PAR
- To Close the PAR
- If the officer is from the same Organisation Unit as that of the PAR Manager, select the tab “Workflow with same organisation” (default).
- If the officer is from another OU, use the tab “Workflow with all organisation”.
- Choose Assessment Year (e.g., 2019-20, 2020-21 as required).
- Click on search directly without filling any other tab except “Assessment Period” for speedy finding of officer’s name.
- One Assessment Year can be divided into different Assessment periods.
- Once a period is consumed, no workflow can be created for that period.
- NRC (Non-Reporting Certificate) – A certificate will be generated and added to the officer’s dossier. NRC period can be less than 3 months or 90 days (for reasons like short reporting period, suspension, unauthorized absence, etc.).
- Working – PAR will be generated and forwarded for self-appraisal, reporting, and reviewing.
- There are different PAR form types.
- Form Type is the type of ACR format the officer reported upon belongs to (e.g., Engineer/Technical/Professor/Doctor/General).
- a. Auto delegation to custodian for manual work – Use this option if the officer at any level is retired/suspended/not included online or there are multiple officers in one stage during the workflow period.
- 1. Workflow needs to be prepared (Shown in earlier slides) before generating PAR as provided in earlier tutorial/slides.
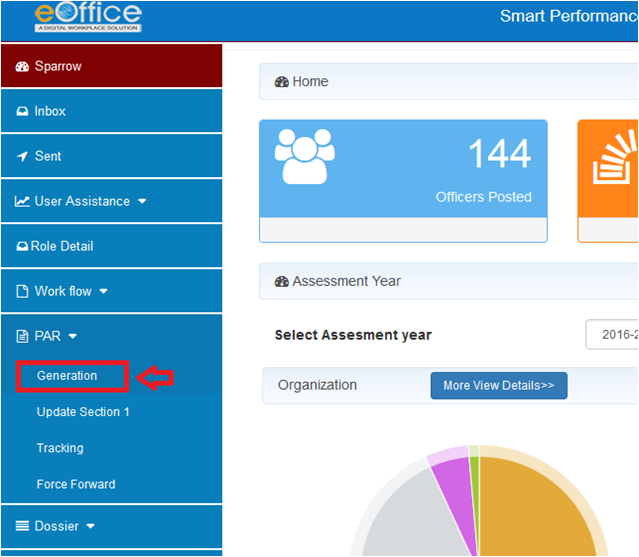
- 2. PAR generation can be done as shown below.
- Select Assessment Year from the dropdown (2017-18, 2018-19 and so on)
- Click on search
- List of all Officers in the OU whose workflow is created for the said Assessment Period will be displayed.
- Click on Generate option against the respective officer for respective workflow.
- Section – 1/Basic Information will be displayed on the screen as given below.
- Section I/Basic Information: Fill the information.
- Any reference document (i.e., Training, Reward, Medical Certificate etc.) to upload click on Browse >> select the file (should be in pdf format).
- Click on Draft to save.
- Click on Send to office reported upon after filling up the form.
- Update Section-I – An erroneous section-I can be reported by officer to alternate custodian prior to sending to Reporting officer by clicking on “Submit Error Report”. The same can be searched by alternate custodian as below: Click on PAR >> Update Section-1.
- PAR >> Update Section-1 >> Choose Assessment period >> Search officer name >> click on icon
- Update the appropriate changes in section-I and click on the Tab “Update Section”.
- Any changes made by the Alternate Custodian on section-I after verification from the “Officer reported upon” by clicking on “Submit Error Report” need a further digital signature.
- Section I – On Clicking on “Send to office reported upon”, the following window will appear to sign the section-1 with DSC or eSign.
- DSC (Digital Signature Certificate) – To use this, register DSC with MahaPAR. Click on the DSC tab in the left pane and Register it.
- eSign – An OTP will be generated and sent to the mobile number registered with AADHAR. On entering the OTP, the document will get digitally signed.
- PAR Tracking – Generated PAR status can be tracked by clicking on the tab PAR >> tracking >> Officer Search >> Click on APAR ID.
- PAR status will be available according to the workflow set in PAR tracking.
- PAR current stage can be tracked.
- PAR Force forward – PAR can be forwarded to the next level by clicking on the tab PAR >> Force Forward (Reasons to be recorded).
- After the PAR is reviewed by the Reviewing authority, it advances to the Custodian to disclose it to the officer reported upon.
- After completion of Reporting / Reviewing of the PAR, custodian will send the PAR for disclosure to the officer.
- Officer can view the PAR in Inbox and tab My PAR.
- Officer needs to acknowledge the PAR for further process.
- As the officer acknowledges the PAR, it is reflected in the Inbox under tab Process of the custodian.
- Custodian will click on APAR ID and select the “Close” tab to close the PAR which will be available in the Dossier of the officer and Custodian/Cadre control authority (PDF format).
- While setting workflow, if “Auto delegation to custodian for manual work” option is selected for any level, the PAR at that level advances to the custodian for manual work.
- Such PARs can be viewed in the Inbox and tab Manual Process.
- Section upload – While processing such PAR manually, the custodian can upload sections (i.e., physically written/assessed sections by reporting or reviewing authority).
- Primary custodian has additional authority to DELETE the PAR of an officer which has not processed to the next stage of the Reporting Authority.
- Search for the respective officer whose Workflow has to be deleted.
- Click on Update Workflow.
- Click on Delete option with confirmation in the followed dialogue box.
- Primary custodians get the dashboard report after logging in, which displays as below.
- To check for an officer’s closed PAR, click on Tab – Officer completed PAR.
- (To find closed PARs of the Primary custodian themselves, click on Tab – My completed PAR.)
- 2. Search for respective officer’s details.
- 3. Click on Officer name.
- 4. Click on DOWNLOAD option to get the PAR.
- Project Management Unit (PMU):
- System Administrator: GAD/13 (022-22794298)
- E-Mail: support-mahapar@nic.in / mahapar-admin@gov.in
- Located at: 19th Floor, New Administration Building, Mantralaya, Mumbai – 400032.


Officer’s Role for Subordinate’s PAR Assessment
Officer as a Reporting/Reviewing Authority:


Role of Custodian/PAR Manager
Following are the roles assigned to Custodian/PAR Manager:
1. Role of PAR Manager is only limited to creation of workflow and PAR Generation.
2. Follow the below steps to create Workflow.
Click on Workflow tab → Workflow → Create/Update.

3. You will see the following window (Employee Search during Workflow Creation):

4. Search the officer’s name from the populated list of data.
5. Click on Create Workflow against the respective officer’s name.

6. On clicking Workflow Create/Update, you will see the following window.

7. Select workflow period (should be within the respective Assessment period).
Example: If workflow is created for 1.4.2018 to 31.10.2018, the second workflow can be created from 1.11.2018 onwards.

8. Select status as NRC or Working.

9. Select form type and click Continue.
You are requested to select from the dropdown as per the officer’s cadre.

10. Choose Reporting and Reviewing authority for the period of workflow.
11. To search Reporting/Reviewing Authority, click on the “Magnifying Icon” or select from the dropdown list.

12. After selecting the officer’s name, the workflow can be saved by clicking on “Save”. However, during exceptions, the following features may be used:

b. Skip can be used when Officer at Reporting Stage and Divisional Commissioner/Reviewing authority is same.


Custodian can view such PAR in their Inbox and tab Process as shown below.

Custodian will click on tab – “Disclose to officer” after completion of all stages.


This can be achieved in following ways:


0 Comments
If you have any doubts, suggestions , corrections etc. let me know